Winter Arrivals, Next Steps

I've been a busy bee, flitting around to various places to source pieces for building up the battery packs. I managed to gather quite a few of the important pieces before 2023 came to a close, but didn't manage to find the time to post an update. In no particular order:

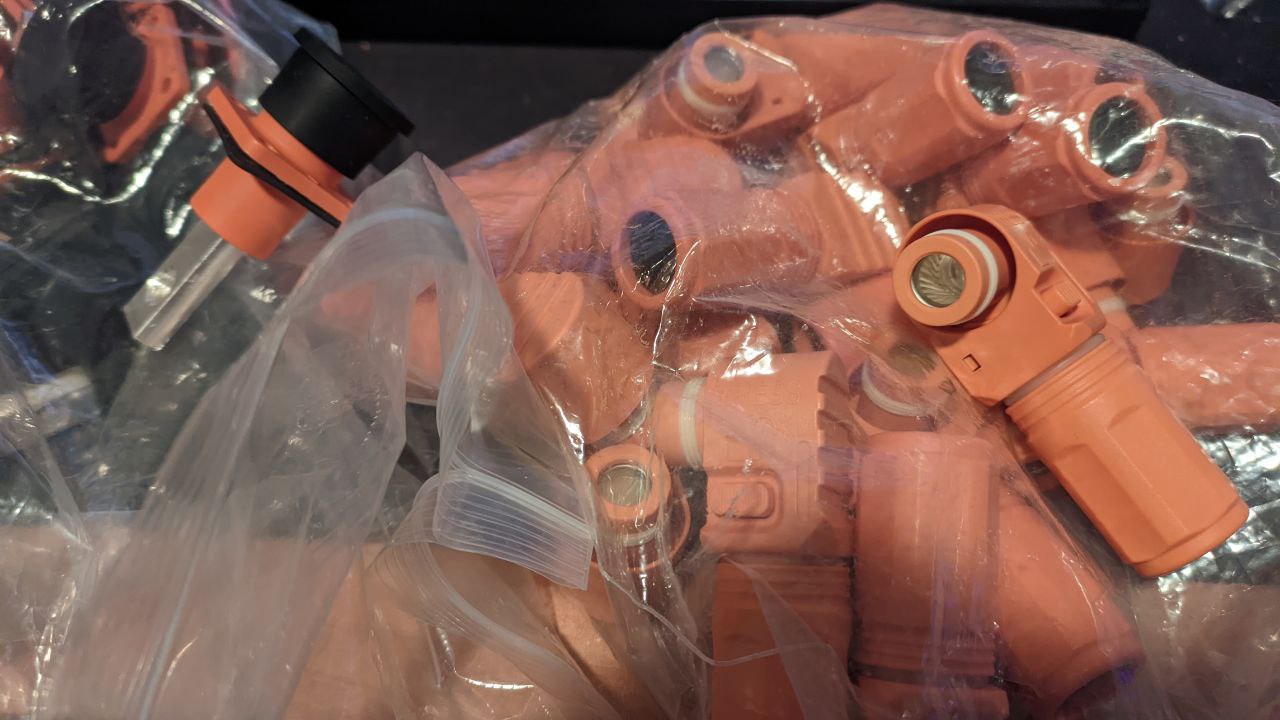
High-current connectors

These snap-on connectors are perfect for connecting power through the various battery packs and to the end devices. They're vibration and water-proof, and can handle quite some current. Both the connector and the socket are coming from JNIcon in China. JNICon Connectors

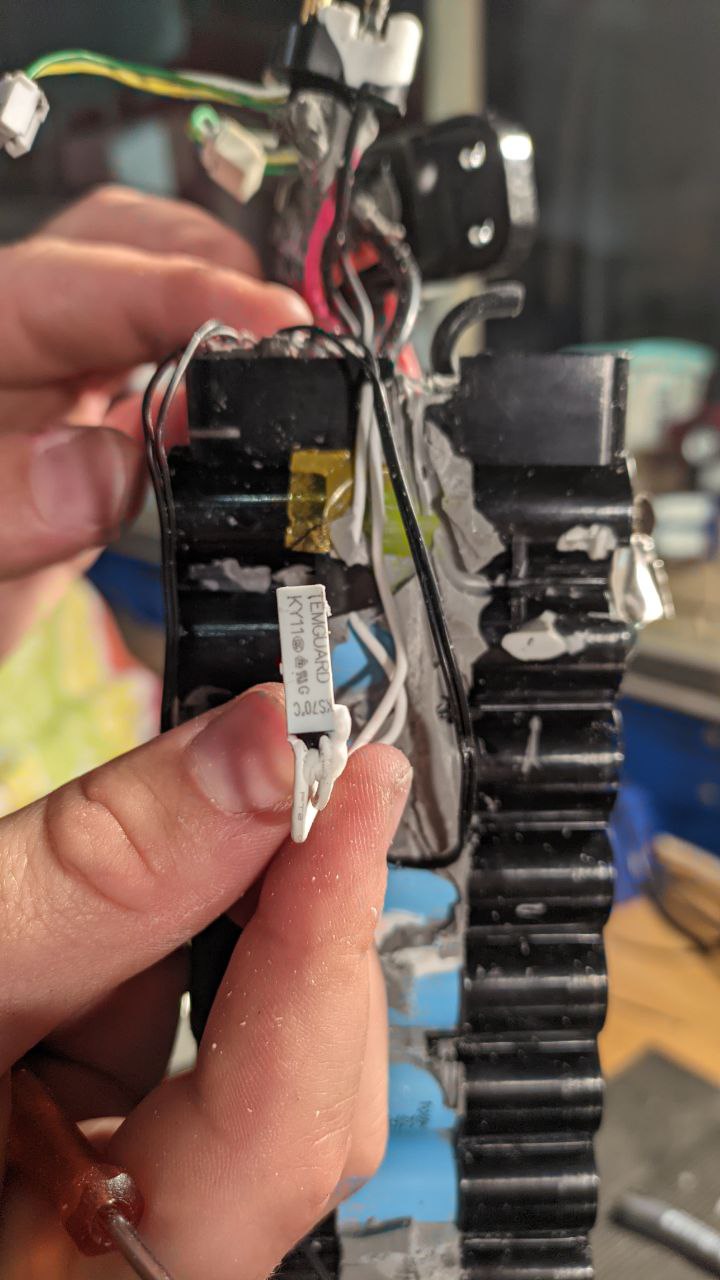
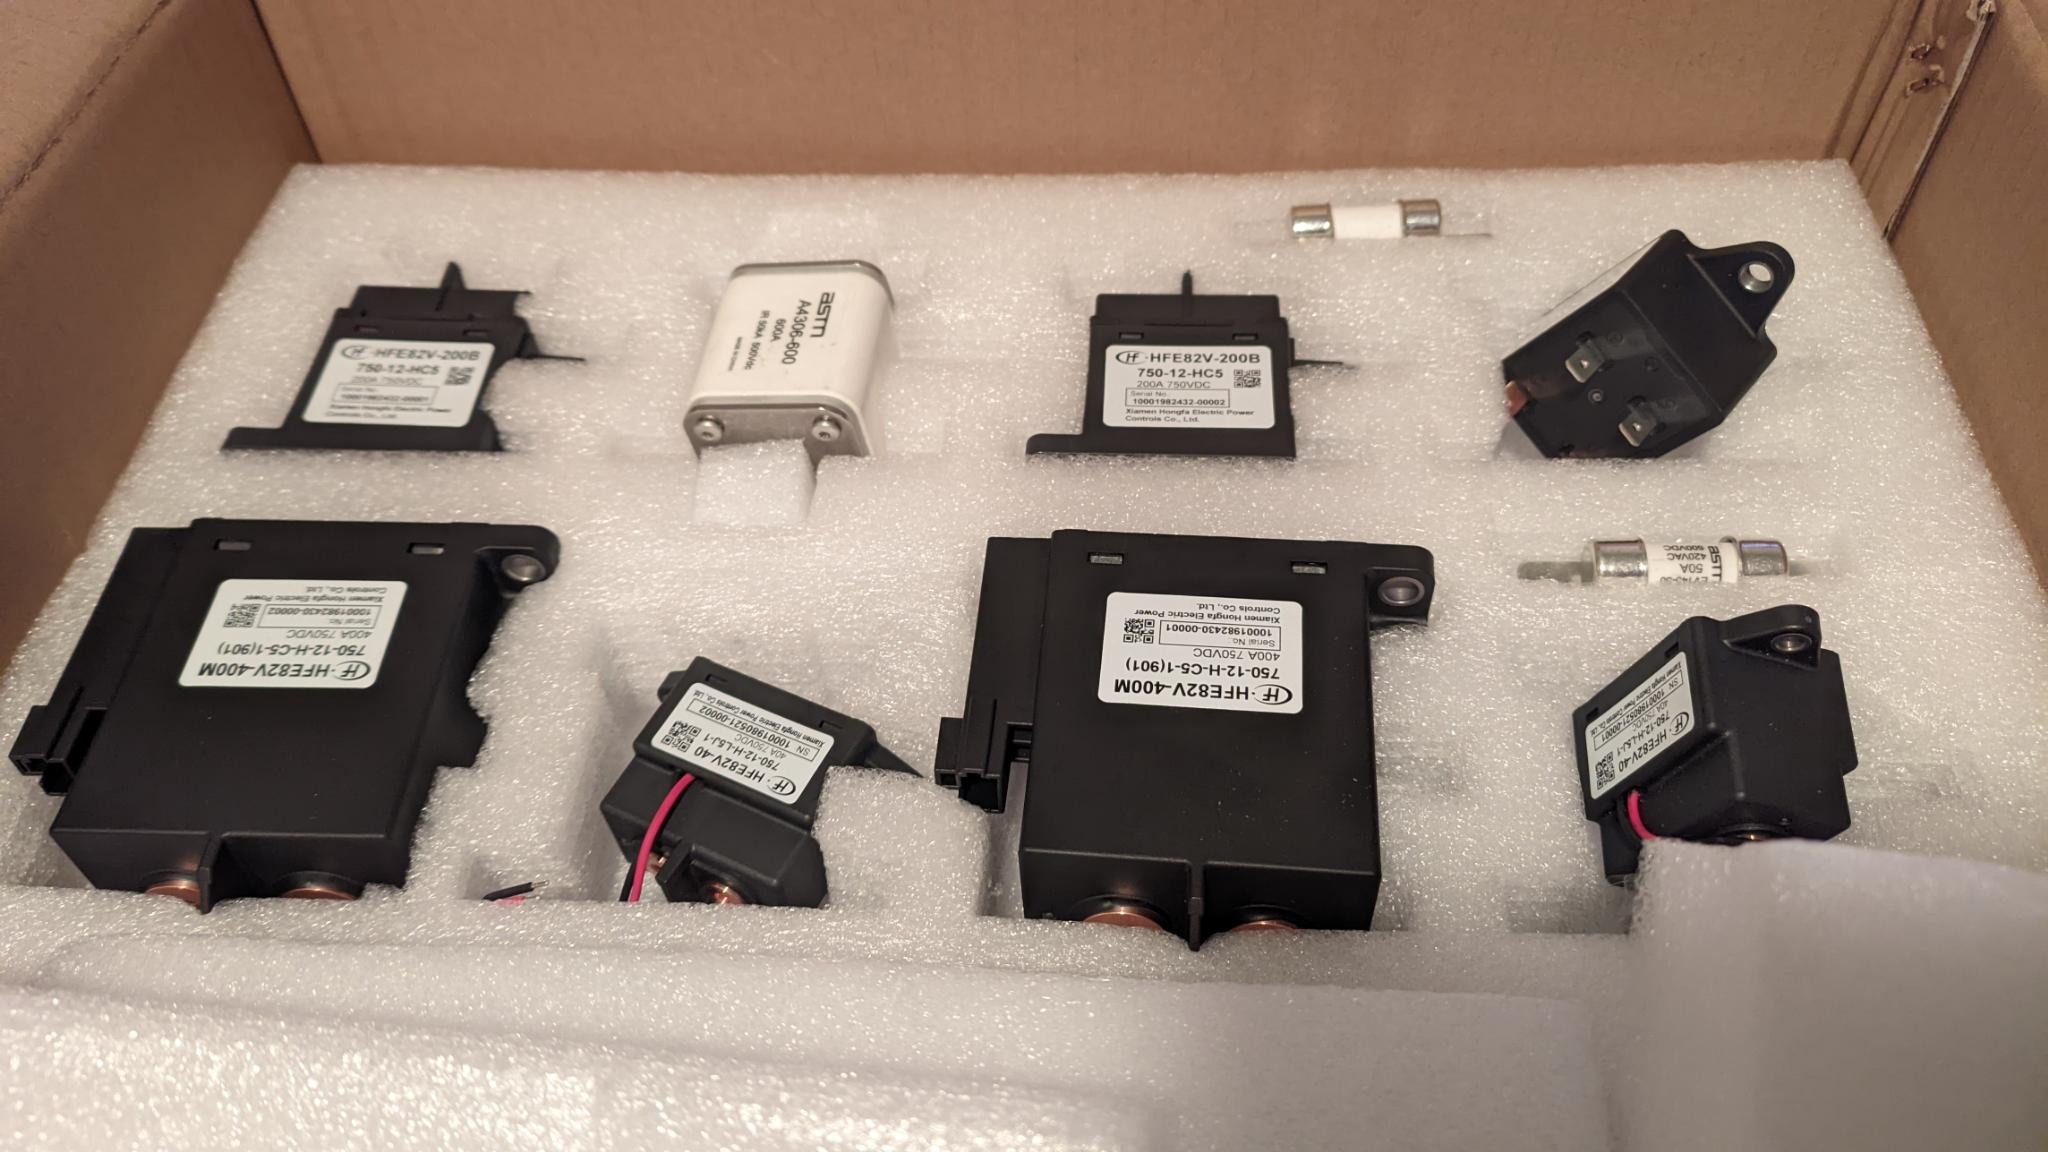
High-current fuses and DC Contactors

This is a massive fuse: Main Fuse

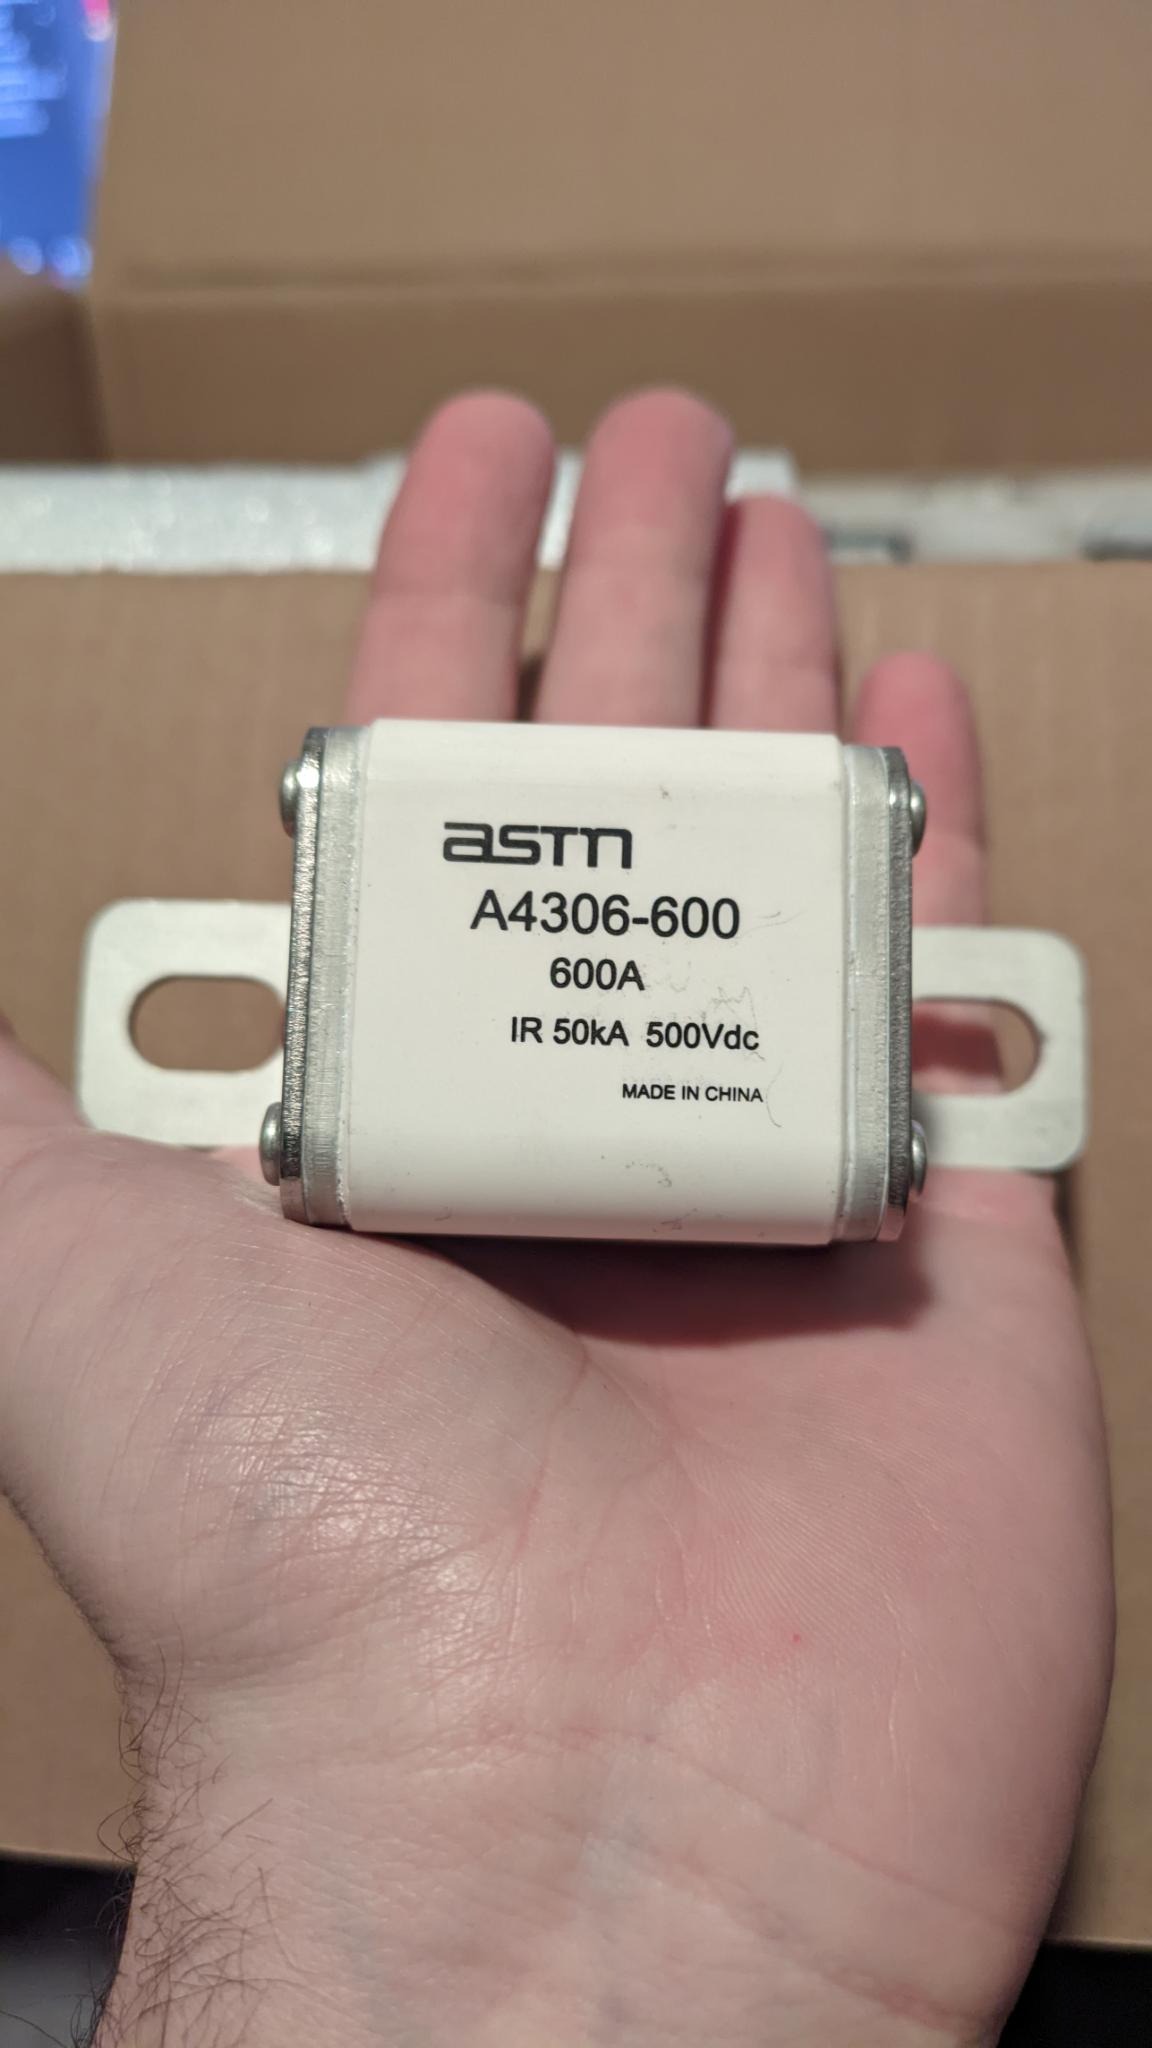
Which is good, as it is one of the main fuses for the system, needing to be capable of interrupting >550A at >400V in the case of a dead short of the traction battery.

The other HV fuses are a bit smaller, protecting various subsystems like HVAC and the OBC. The main contactors (think like a relay, but for DC) are even bigger than the fuse! The big issue with switching DC is, in contrast with AC, there is no "zero" crossover point, so attempting to disconnect the circuit under load has the potential to start a spark which will self-sustain and cause big issues. These contactors are responsible for connecting and/or disconnecting loads to the traction battery. Fuses and Contactors

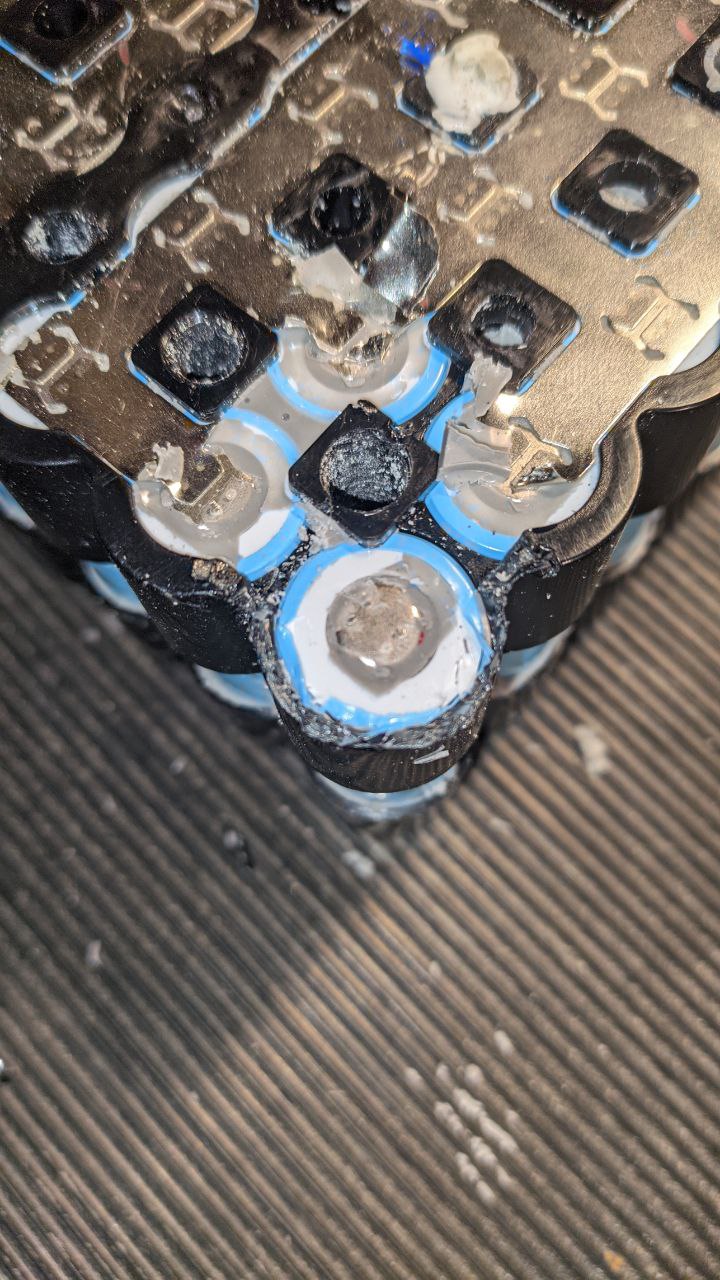
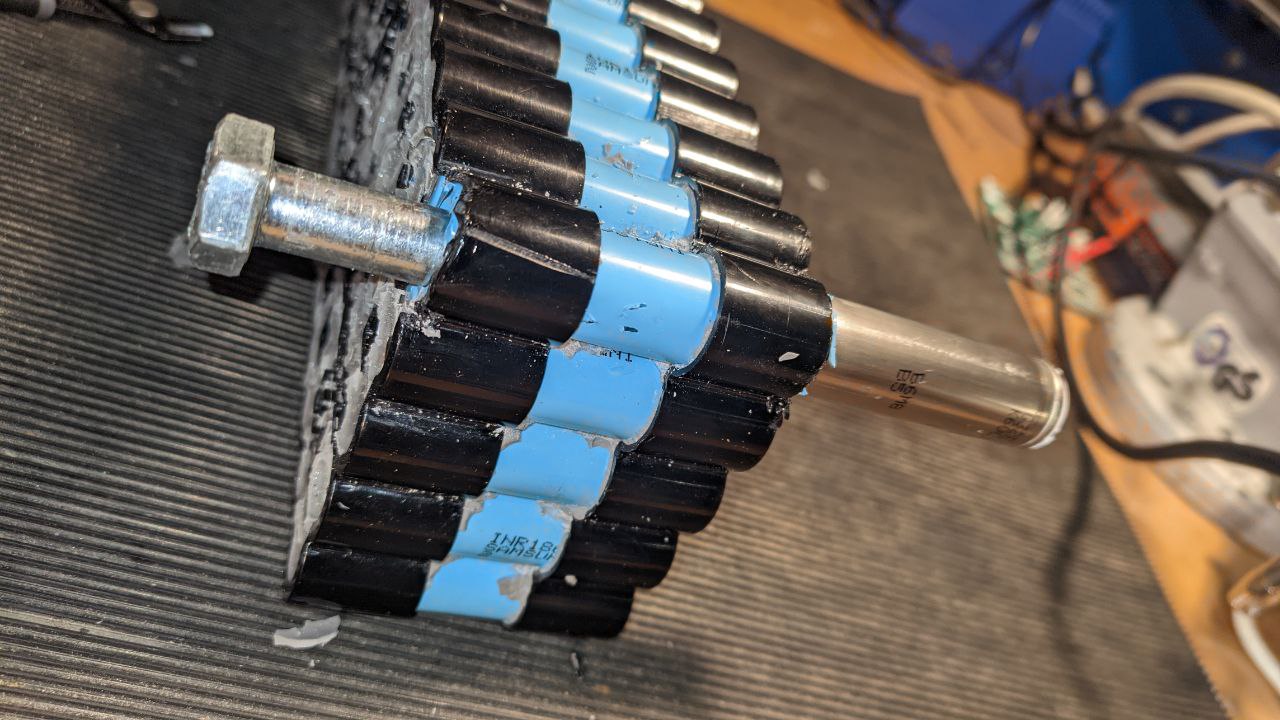
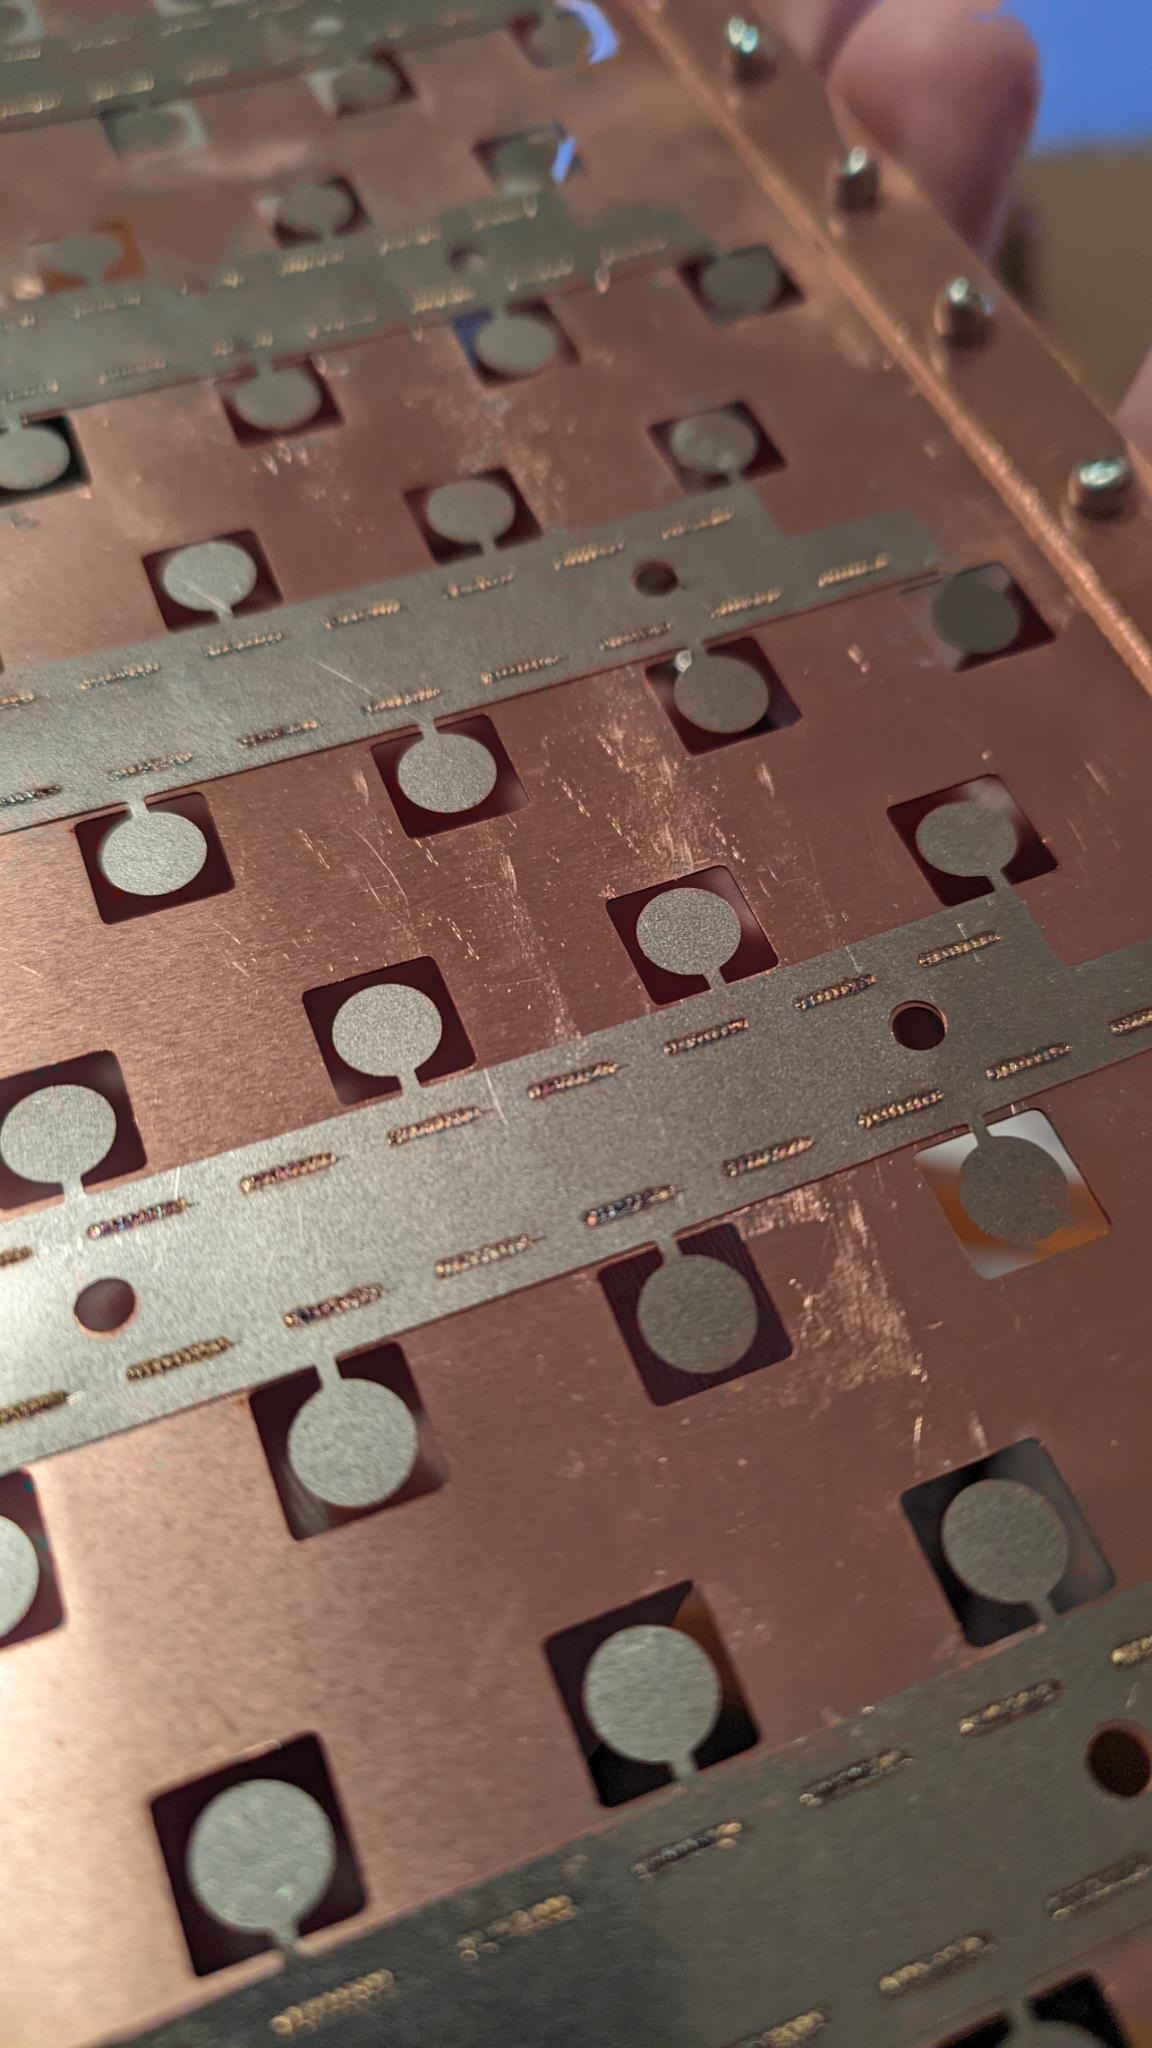
Copper/Nickel Hybrid Collector Plates

I originally was planning to build the battery packs up with nickel strips, with the cells being connected to the grid of strip with small fuse wires. After running the numbers, however, it was clear that not even the thickest, widest strips of nickel metal had the required ampacity to carry all the current I was asking without getting really quite hot. I will probably do a dedicated post for the design of the battery pack at some point, but for now know that I designed a custom hybrid copper/nickel plate for the battery packs which combines ease-of-welding with a high ampacity. Bonus, each cell has a small nickel fuse which limits things to <20A and should prevent a fire in the case of a single-cell short. Collector Plate Closeup

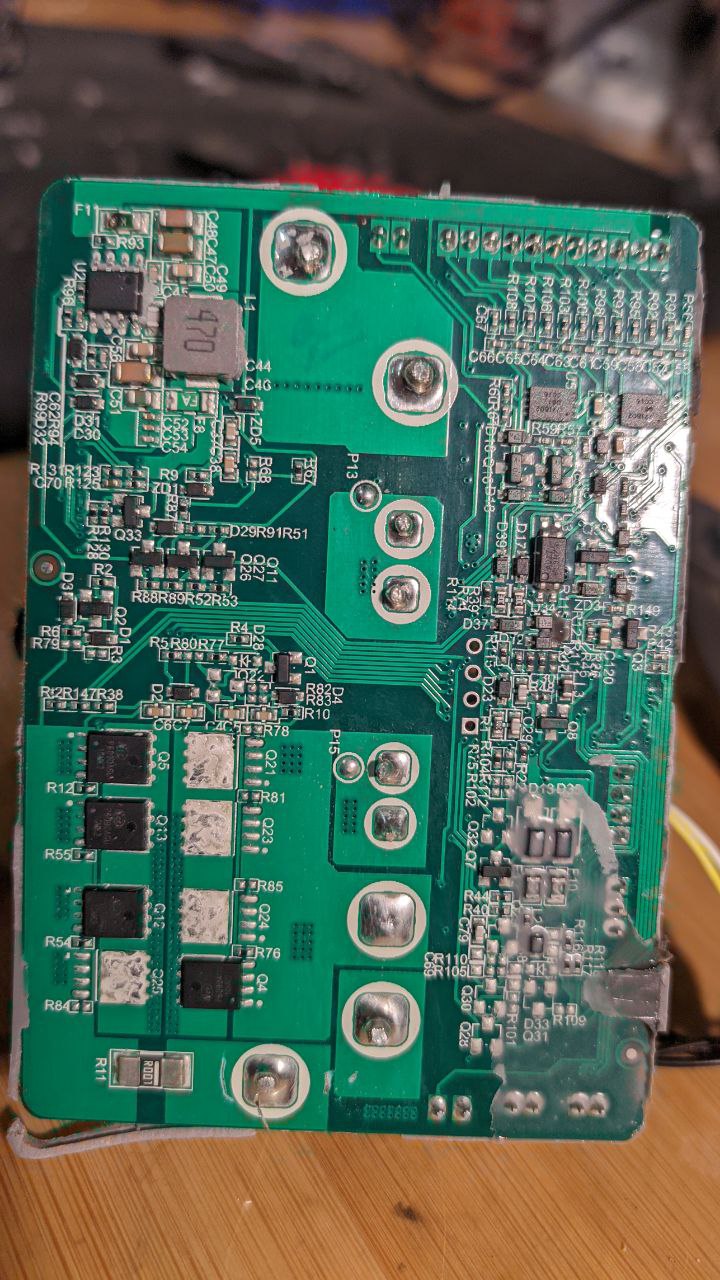
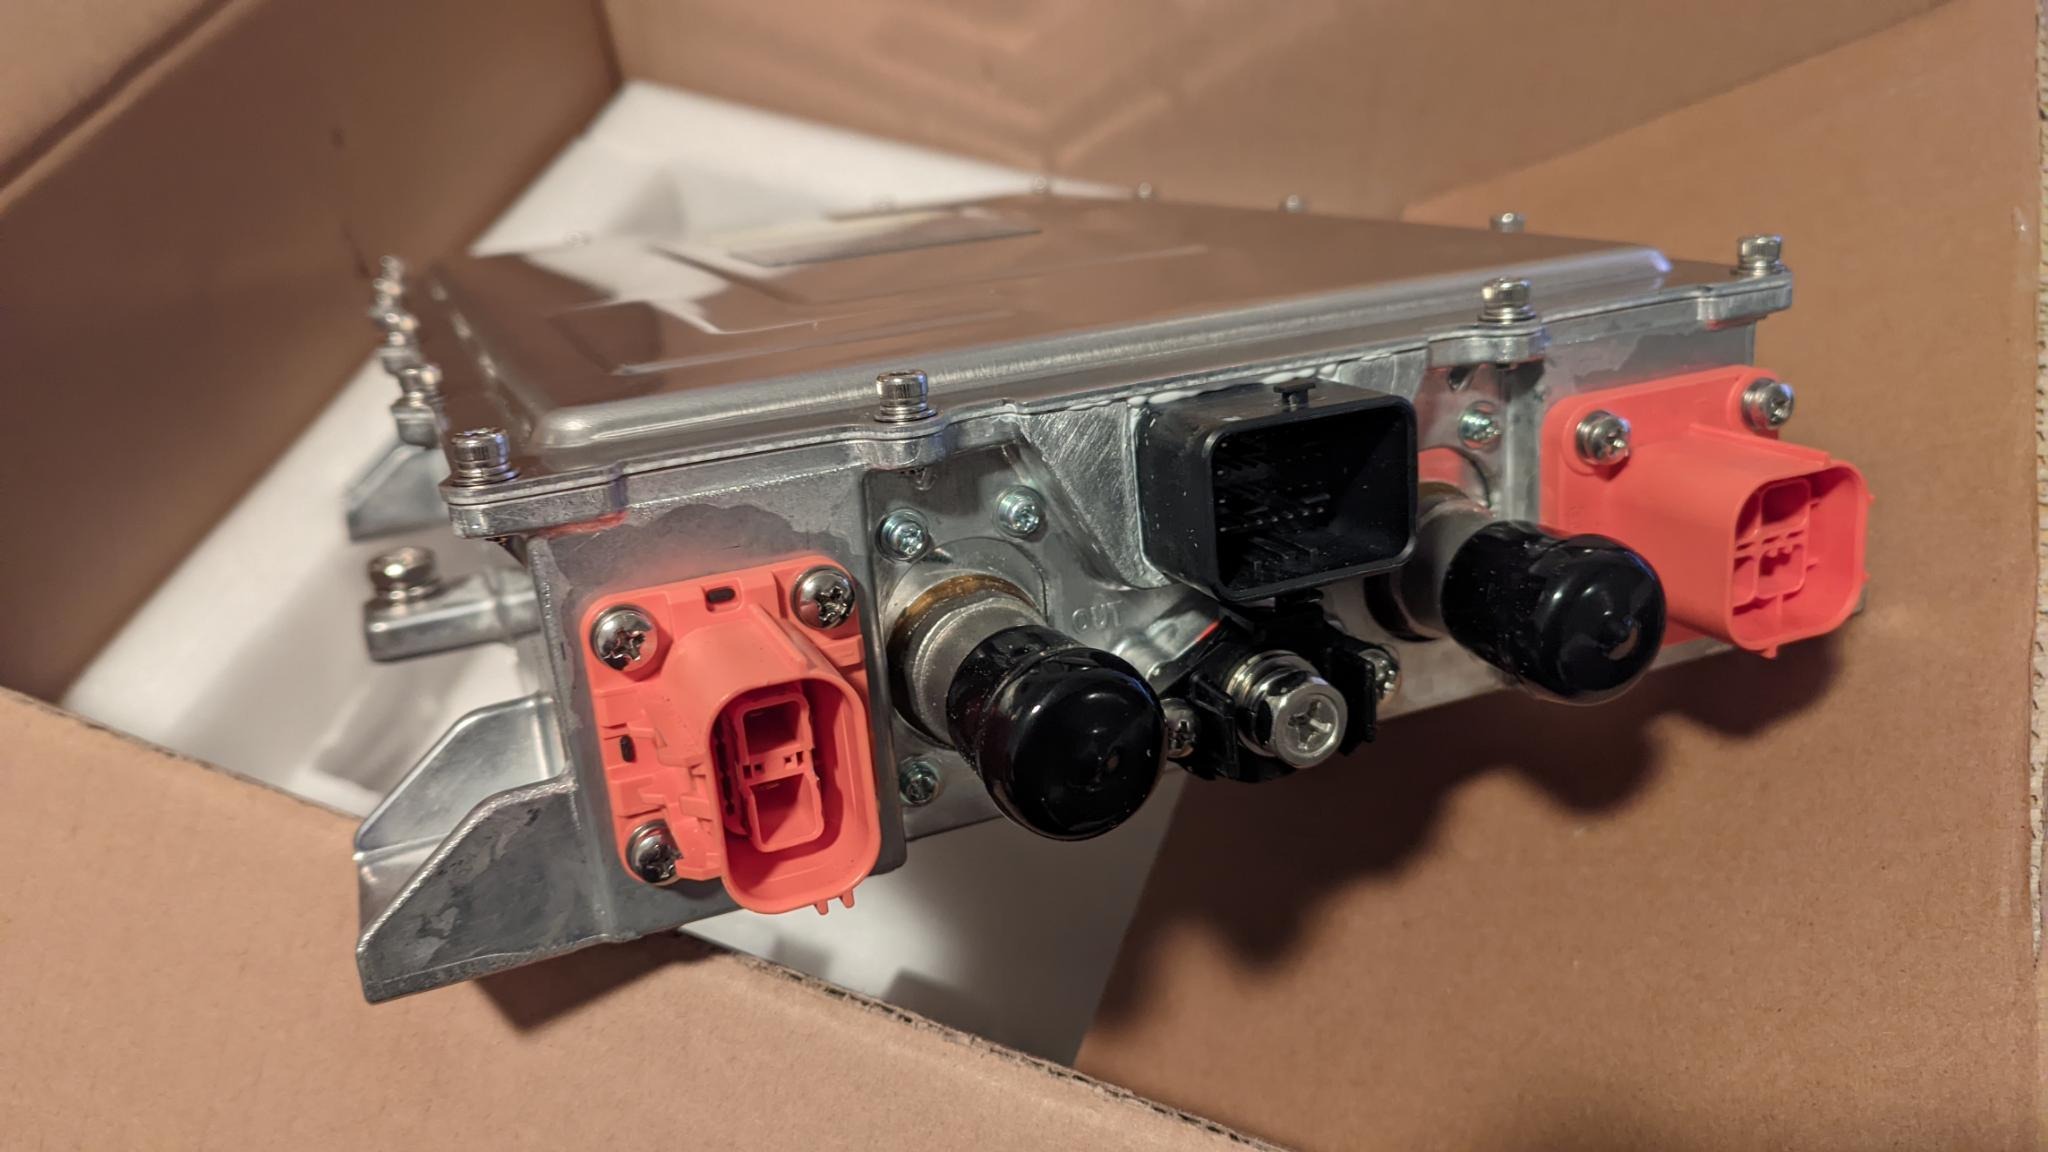
Onboard Charger and DC/DC

I will definitely have a whole post about this OBC from Kanchan. It's an onboard charger with a maximum of 6.6kW (single-phase) from AC, as well as a 2kW DC/DC to provide the 12V from the traction battery. It's liquid cooled and smol OBC

Next Steps

The biggest next step will be automating the harvest of the raw cells from the donor packs... hopefully a big update on that coming soon. Also looking into the motor control concept, which will be a roadtrip, and a few other bits and bobs outstanding... The RX-E will drive in 2024!

Scooter Battery Teardown Part 2: Electric Boogaloo

It was past time to get back at the battery module, to figure out how I'm going to harvest all the cells before I even consider how to put them together into a new module. Together with my battery-massacring compatriot, we resolved to finish the job. When we last left our patient, it looked like this:

A battery pack

With the assistance of a drill press and a 5.5mm bit, we reamed out the rest of the spaces between cells. It turns out, the two parts of the shell are screwed together!

A battery pack with yellow electrical tape over some holes

It seems every second hole is an opportunity for a screw (some marked with yellow, above). However, even after reaming, the shells still wouldn't come apart. We took a detour and popped out the BMS Board...

Wires coming out of a BMS

Which was hiding under a mass of filler materials. Here is the dead BMS, front and back, freed from its silicone prison.

Front of the BMS Back of the BMS

If I cared at all about the BMS part, I'd look at the STM32G0 a bit closer... but I don't :) There was a very interesting thermal fuse included:

The thermal fuse

It was then that the scope of the task made itself readily apparent:

The secret is revealed

The battery pack is designed in such a way that it goes together quite easily, and is extremly rigid and robust against vibrations and other mechanical stress. The nickel collector plates are likely welded after the frames are on, as the nickel plates form part of the retention mechanism for the cells (together with a little bit of plastic which overlaps each cell). This will be a nightmare to disassemble with only hand tools.

A victim cell appears

Nevertheless, we would not be denied our prize. With some diagonal cutters and some very careful surgery, we were able to cut the supporting material away from one of the cells in the corner and then very carefully tap it out with a bolt.

The prize

I took the cell home and threw it in the battery cell tester for a few charge/discharge cycles:

Tester

27 milliOhm is within the 35 max specified for the battery, and once the testing cycle is complete we'll see how much capacity is left--I am expecting quite a bit.

As to how to deal with the other cells and battery packs... well. They have to go a bit more smoothly. In the meantime I will get some replacement insulation sleeves and rings to ensure everything is in tip-top shape for the eventual pack construction.

Voltage Sensing Circuit

I've decided to use a BMW i3 LIM to manage the CCS Fast DC Charging handshake. There are other solutions, but in comparison they are expensive, or require lots of software development, or the company doesn't reply to my requests for information.

The LIM is mostly self-contained: You hook it up to the signals it needs, the charge port, and it does the rest. You do need to give it information about voltage present on the charging side of the Fast DC Charging contactors, which isn't 100% straightforward for safety reasons. This post is about figuring out the right way to give the LIM the information it needs.

So, first to our task: Create an analog circuit which takes 0-500V and creates an isolated voltage between 1.42 and 4.8v with a linear response. There are a few different ways to accomplish this, but I chose to use a part from TI which keeps the part count to a minimum, the AMC3330.

The AMC3330 is a precision, isolated amplifier with a fully-integrated, isolated DC/DC converter that allows single-supply operation with an input optimized for directly connecting to high-impedance, voltage-signal sources like resistor-divider networks to sense high-voltage signals.

... perfect.

This is what we have to work with: Output vs Input AMC3330

If we read the datasheet, we learn that the AMC3330 is "happiest" (read: most linear, least distortion) between 0 and 0.725V of differential input. So we need to create a high-impedance voltage divider which turns 0-500v into something that the AMC3330 is happy to read. A bit of resistor math yields a divider with 560k and 1k1 ohm. I added an additional 200k ohm to ground for extra impedance so that the total impedance is ~750k ohm, which would result in a total of 0.44 mA current (aka, nothing).

Next, given we know the input to the AMC3330 will be 0v - 0.722v, let's figure out what the output will be. Figure 6-8, above, shows a summary: The outputs will both be 1.45V when Vin = 0v, and they will diverge to Voutp = 2.22v and Voutn = 0.77v (a differential voltage of 1.45v) at Vin = 0.722v. We need to turn this into a single-ended (referenced to 0v) signal for the LIM. To do this, we use a rail-to-rail op-amp, the TLV9001. We want to shift the signal up by 1.42V (so 0v -> 1.42V) and scale the output to max at 4.8V (so 1.45v -> 3.35V. I was never really good at analog, so I opened up the trusty Falstad Circuit Simulator to try some resistor values.

Falstad

After roughly recreating the AMC3330 input and output (left side), I set up a circuit with the TLV9001 on the right side. The simulator confirms that with 500Vin, Vout=4.807V and with 0Vin, Vout=1.415V. According to Wolfram Alpha, that's within 0.005v of correct across the entire range. You can play with the simulation yourself by clicking here.

Final Circuit

Here's the final circuit (the resistor values are those from the Falstad circuit, mapped onto 5% resistor values which is why there are a few in series in places).

Let's talk (more) about batteries

So, with some additional time to muse, I am definitely going to split the batteries into 10S60P modules. There are some good reasons why:

  1. 10S is only 42V max, which means that when a module is taken out of the vehicle (or being built) it's low voltage and doesn't require any special handling
  2. One "row" of battery cells instead of two makes cooling simpler, as well as cell construction much simpler
  3. The size will be a bit smaller than 100cm x 8cm x 25cm, which lets me get a bit more creative with how they come together.

If the individual modules are separable, that will have to be considered with the BMS (it doesn't like groups being separated while plugged in...) but I think the advantages are worth it.

Additional thoughts:

  • Trumon makes serpentine heat exchangers designed for cylindrical cells. They will keep all cells in a pack within 5c of each other, and are probably a better solution than anything I was thinking of before with a cold plate--they're probably also more expensive.
  • I'll want some sort of "frame" to keep the batteries in. Since I have access to 3d printers with large print areas, I could print a frame, but I could also laser cut a frame out of PC or PETG (so long as they're flame retardant, at least B1/UL-94 V0)
  • I will also want some sort of thermal transfer material, as well as structural support internally. There are a ton of options here, from the ultra-expensive DOWSIL 3-6548 (A thermally conductive yet insulating silicone foam) and SEMICOSIL 962 TC to the really cheap silicone potting compounds, I will need to choose something. I want at least 2W/mK, and some voltage breakdown resistance. I looked at MG8327GF25 and GLPOLZ XK-S20.
  • I think PETG is a good material to make the "enclosure" out of, since there will be heat exchangers internally. PETG is shock and vibration resistant, it is fire-resistant, and you can work with it with a variety of tools. It's available in transparent, so you can see what's going on (visual inspection of cell fuses)
  • Given that there will be one layer, I'm pretty sure that using nickel strips internally will be fine, and then bonding them to a bus bar for the terminals. On one side, the strips will be directly welded to the cells, and on the other side, they will run between the cells and be connected with a fuse wire rated for 10a (roughly, 29ga tinned copper wire).

I still need to figure out what connector(s) I want for the non-HV part of the battery module (thermistors, cell taps, etc.), and how I want to affix the battery modules to the vehicle (mounting points? straps?) as each one will way at least 30kg and likely more like 40. How thick will the PETG need to be to hold up 40kg?

Let's talk about Batteries

Let's talk about batteries and battery packs.

As per the plan, I want the overall battery capacity to be provided by 4800 18650 cells, arranged in an 80S60P configuration. According to the battery cell datasheet, that means the battery pack will be able to deliver 384A continuously (2C), representing 112kw or 150hp, and up to 576A peak (3C), representing 168kw or 225hp, for short burts. The voltage under load will sag to 292v, but fresh it will be 336v, so this puts it right in the range of optimal for the Tesla drive units (either 320V or 335v optimum, depending on 3D6/3D7 (performance or base)), as well as the OBC I plan to use (~330V charging voltage).

I want the overall battery pack to consist of identical sub-modules. This will make it easier to design and test, as well as give me a target for fabrication which I can already start with. The Orion 2 BMS (configured as 96-S) has 8 cell groups, each of which can manage up to 12 cells, and 8 thermocouple inputs. The 96-S variant has 2.5kv isolation between groups, which considering our 80S architecture, means that if each group is 10 cells, it will fit perfectly. If each module is two groups, that means that each module will have two thermocouples, and can be individually fused without causing potential danger.

Looking at the overall volume available for battery, I defined (somewhat arbitrarily) a reasonable size pack as 100 x 15 x 25 (cm). The maximum amount of cells I could fit into that volume is 1372 (14 rows of 49, with 2 columns), but that doesn't leave any room for cooling, or bus bars, or really anything other than battery. Since the total number of cells I am going for is only 1200, I can fit that perfectly with a (13 x 46+2) x 2 arrangement. It looks something like this: Battery Pack Dimensioning

Each module would weigh a minimum of 60kg just from the battery cells, so with the enclosure and cooling and bus bars and everything it's probably going to be closer to 80kg. Currently I plan to fabricate the modules out of extruded aluminum, polycarbonate, and fiberglass. Each module will have two identical but mirrored layouts of 600 cells each, arranged into 10S60P. The reason for this is so that I can run the entire string from the back of the car up to the front and then back to the back without excessive lengths of high voltage cable. (follow the pink line in the picture below to see what I mean) Four modules arranged in the car

For the BMS, I'll need to integrate two thermocouples as well as the cell taps (20 of them) into a nice automotive-safe connector. I'll want to have a coolant manifold/connection on each side, and 2x hv connectors (one for each pair--part to be chosen).

Depending on physical constraints, it might make sense to split each module into two half-sized modules with 600 cells. This would double the number of connectors and water connections, but potentially make assembly and mounting easier.

Motor Musings

There are a few different variants of the Model 3 RDU in the field. Looking at some measurements, I think I'm going to want one the 3D6 variant, which has the newer "hairpin" style stator windings, and the performance specs (lower "optimal" voltage of 320v instead of 335v). The 3D7 might even be better (wider range of speeds where it has power), but it would require a different battery architecture (higher voltage) which would throw off my plans for the AC/DC and other things...

Looking into driving the Tesla Model 3 RDU itself, there are a few different ways to interface with it:

  • Ingineerix on youtube posted a video in 2020 showing the interfacing via CAN: https://www.youtube.com/watch?v=LWVt5I0XKyk
  • EV-Controls sells a commercial solution to do the same https://www.ev-controls.com/product/ev-controls-t2c/
  • There's a massive thread on openinverter about the model 3 drive unit which has been going on (also since 2020): https://openinverter.org/forum/viewtopic.php?f=10&t=575

I'd prefer greatly to integrate the messaging/control to the motor into whatever CAN/CAN device I have to develop to drive the existing onboard electronics and interface with the charger and BMS... but unfortunately life doesn't appear to be that simple:

The Tesla drive units have quite a bit of logic on them, amongst the responsibilities of the inverter is implementing a cryptographic challenge to the security controller (part of the immobilization system). No (paired!) security controller, no dice. I asked Ingineerix via reddit messages if he had any hints or suggestions, and he very kindly responsed with these salient points:

  • The information to bypass the security pairing is extremely sensitive as it'd allow people to trivially steal cars. I'd have to reverse-engineer it myself, which considering it took Ingineerix months with access to a working car and years of experience working with automotive CAN (and electric conversions) puts this into the realm of "not really possible"
  • Once the motor is outside of the car, the pairing process between motor and security controller is extremely difficult if not impossible, and you'd need access to Tesla's service tools to do it
  • Be sure to get the connectors that go to the motor, as you can't get them aftermarket (and most sellers don't include them)
  • It's a really bad idea to do this piecemeal, and much smarter to buy a whole (dead) model 3 donor

If only I had the space... looks like I will be budgeting for the T2C. I also sent Ingineerix some "gas money" as his advice has definitely saved me some pain, time, and money.